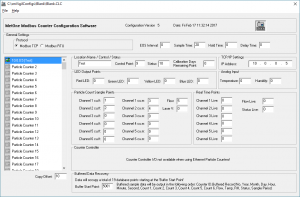
The Buffered Data Logger in enVigil FMS is for recovering buffered records from within the particle counter. This is used when communications is lost between the computer and the particle counter. The particle counters will carry on storing records inside their internal memory while there is no communications to the computer, a standard Met One 6015 particle counter can store up to 1000 records within its internal memory.
The Buffered Data Logger works with our Met One Modbus driver using the point at the bottom of the driver labelled ‘Buffer Start Point’. This start point is the first point out of 19 points that the driver will occupy, so if for example you choose to input point ‘200’ you must make sure that points 200-219 are able to be used and will not be touched by any other driver.
Configuring the Met One Modbus Driver
The only configuration the Met One Modbus driver needs is the ‘Buffer Start Point’ filled in, this is a global point for all particle counters within that driver, and will not need to be a unique point per counter.
We recommend the start point to be in the 5001+ range as these are the system points in enVigil, and it also separates them from the standard I/O points in the database so it does not cause any confusion.
Configuring the Buffered Data Logger
The configuration of the Buffered Data Logger driver has a few more points to fill in, but can still be set up very quickly.
The first section you will need to fill out is the ‘General Settings’ section.
The ‘Destination Log File Path’ can normally be left as-is. The ‘[%L]’ is a wildcard that will substitute in the particle counters ID into the logfile name.
The driver can also be set up to either work with a single counter (Simple 1-to-1) or use an offset between counters (Offset from Counter), if you are using multiple counters you will want to use the same offset than the Met One Modbus driver is using, this would normally be set to “10”.
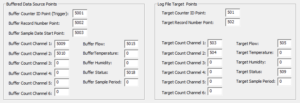
If you used ‘5001’ as your Buffer Start Point, the driver should be filled out as the image below shows.
Testing the Buffered Data Logger
Once you have the configuration set up, it’s best to test this. The easiest way to do this is by running a particle counter for 5-10 minutes with valid samples before disconnecting the communications between the enVigil server PC and the particle counter. Once this has been disconnected for another 5-10 minutes, reconnect the communications and enVigil should automatically download these records to the logfiles directory you chose above, for example; “C:\Download…” – you can check this path for new files.
Once working, you will be able to set up buttons within your mimic to point to these new data files, by choosing an action of “Show Trend” you can put the full path to the file in the box to the right of it, for example – if the path that was set up in the Buffered Data Logger driver was “C:\Download\%Y\%m\Counter[%L]%d%m%y”, you would need to enter the same followed by “.LB2” as shown replacing the %L with the location number;
“C:\Download\%Y\%m\Counter[00]%d%m%y.LB2”


